Digital Marketing Practical Blog (Website Development - WordPress)
Let us create a website using WordPress via Pro Free Host. Following are the steps one by one -
1. Open Google Chrome from your Laptop/Computer.
2. Type Pro Free Host on the Google Search
Engine and press Enter.
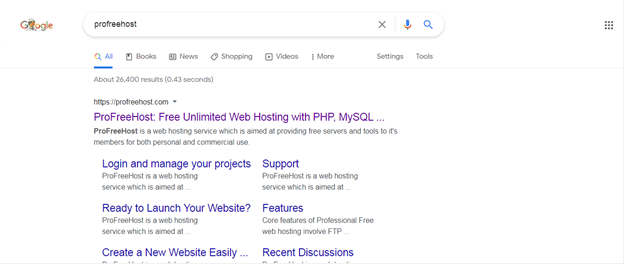
3. Click on the first one.
4. You can see a screen like this after clicking the
first one.

5. Click on Create Account to sign up for free
hosting.
6. Once you click that, the following screen appears.

7. Register your account with an Email Address and a
Password.
8. After that, click on the ‘Tick’ button.
9. After that, the following screen appears.

10. For activating the account, you must go to your
Gmail Account or whatever account you have given.
11. I have Gmail Account so I am going to Gmail
Account.
12. Find the mail and click on Activate Account
button on the mail itself.

13. After clicking that, you will be redirected to
another tab.
14. The following screen shows –

15. Enter some attractive names for your website.
16. Choose any of the following drop-down shown below
to create a free domain.

17. I am clicking on unaux.com.
18. After that click on the ‘tick’ button.
19. After that, a captcha will appear and you just
have to do the task given by the captcha.

20. Click on VERIFY to proceed further.
21. After that, the following screen appears.

22. Click on Manage. After that a screen
appears like this.

23. Click on Control Panel. The following
screen appears.

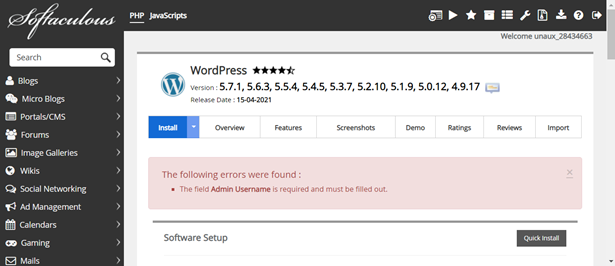
24. Scroll down and click on SOFTWARE and
then click Softaculous Apps Installer.

25. After clicking that the following screen comes.

26. Hover your mouse towards WordPress and
click on the Install button.
27. After that, the following screen appears.

28. Scroll down and click on the Install button as
shown.

29. The following screen shows like this.

30. After that you have to create your Administrator
Username and Password.
31. Scroll down and enter your Username and Password
under Admin Account.

32. After that, click on the Install button same
as (no. 28).
33. After that, the following screen shows.

34. A message will show like this which means it is
installed successfully.

35. After that, hover your mouse towards Administrative
URL: and right click and then click on Open link in new tab.

36. After that you can Log in on WordPress.
37. After you log in, the following screen appears
which shows Dashboard.

38. You can start customizing by simply clicking on Customize
Your Site button is shown at the top or you can even change theme completely
by clicking on change your theme completely.
39. I will change the theme completely.
40. After that, the following screen appears.

41. Select any of the themes from above and Install.
How to Add Themes directly?
1. First go to Dashboard, then click on Appearances, and then click on Themes.
2. Click on Add New.
3. Search or Scroll down for more themes
4. Install your theme. I am installing and activating the Astra
theme.

5. Click on Activate button to activate the
theme.
6. After that the following screen appears.

7. Then, click on Get Started to proceed
further.
8. After that, click on any of the theme website
builders. I am selecting Elementor.

9. After that a screen appears like this.

10. Search and install the theme website.
11. I am selecting the following theme.

12. Click on either Import Complete Site or
Import a single Template.
13. After clicking the above, the following dialog box
appears.

14. Click on the Next button.
15. Then again it will ask

16. Then, click on Submit and Start Importing.
17. A successful message shows on that dialog box.

18. Click on the View Template button to view it.
19. It shows as under.

20. You can edit and make your website live.
How to Install a Plugin?
1. Click on the Dashboard, then click on Plugins.

2. Then click on Add New.
3. After that the following screen appears.

4. Search your plugin or scroll down to Install any of
the plugins.
5. I am installing the Cloudflare plugin.
6. After installing, you can click on Activate
to enable its service.
How to Add Pages on WordPress?
1. First of all go to Dashboard and then click on Pages
and then Add New.

2. After clicking that, the following screen appears.

3. Type your Page Name and click on Publish
button which is on the top-right corner of the screen.
4. Again click on Publish.
How to Add a new Post?
1. First of all go to Dashboard and then click
on Posts and then Add New.

2. After clicking that, the following screen appears.

3. Add some title by clicking on Add title.
4. Then, click on Edit with Elementor button on
the top of the screen shown above.
5. After clicking that, the following screen looks
like this.

6. Drag any of the Elements given. I am dragging Text
Editor.

7. After that, the screen looks like this.

8. You can edit from the left-hand side Editor only.
It will be updated automatically on the right-hand side.
9. After Writing click on Publish button to
publish.
10. After that, you can add more elements from the
icon (Right-hand side).
11. You can drag those elements one by one.
Comments
Post a Comment